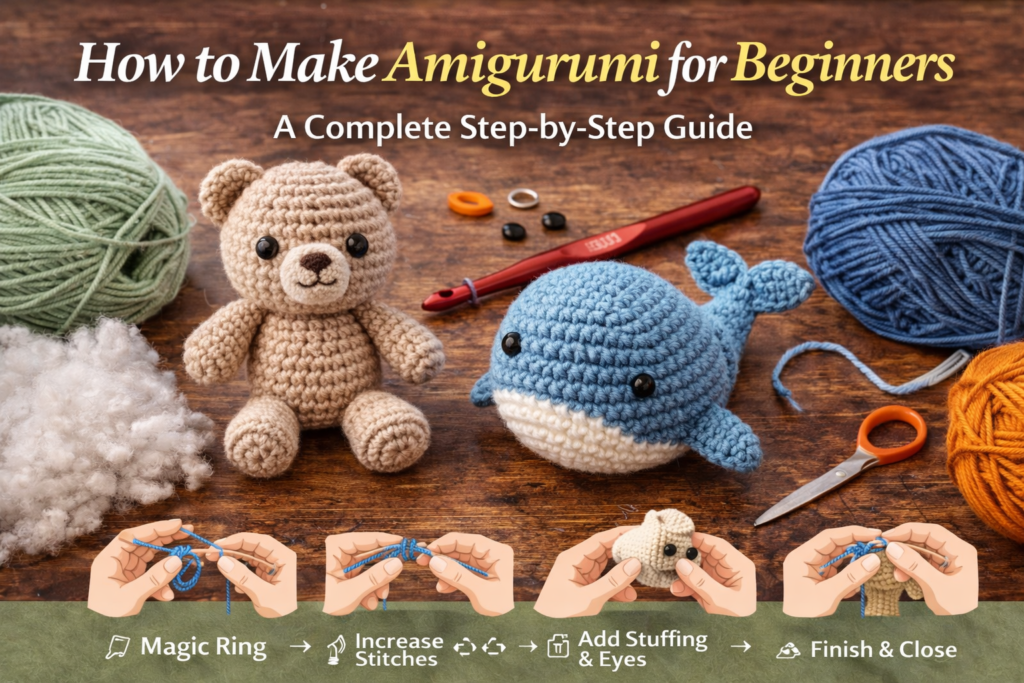
Amigurumi is the Japanese art of crocheting small stuffed toys and characters. From cute animals to miniature dolls, amigurumi projects are fun, creative, and surprisingly beginner-friendly.
If you’ve always wanted to create your own handmade plush toy but didn’t know where to start, this step-by-step guide will walk you through everything you need to know — from materials to finishing touches.
By the end of this guide, you’ll understand the basic techniques needed to make your first amigurumi project.
What Is Amigurumi?
Amigurumi is a crochet technique used to create small, stuffed yarn creatures. Unlike flat crochet projects, amigurumi is worked in continuous rounds to form 3D shapes.
Most amigurumi patterns use basic crochet stitches, which makes them ideal for beginners who already know how to make single crochet.
Materials You Need for Amigurumi
Before starting, gather these supplies:
- Crochet hook (2.5mm to 4mm works well)
- Cotton or acrylic yarn (light colors are easier for beginners)
- Stitch marker
- Yarn needle
- Scissors
- Polyester fiberfill stuffing
- Safety eyes (optional)
Using a smaller hook than usual helps create tight stitches so stuffing doesn’t show through.
Step 1: Learn the Magic Ring (Magic Circle)
The magic ring is the foundation of most amigurumi projects.
- Wrap yarn around your fingers to form a loop.
- Insert hook into the loop.
- Pull up a loop.
- Chain one.
- Make 6 single crochet stitches into the ring.
- Pull the tail tightly to close the circle.
This creates a tight center with no hole.
Step 2: Work in Continuous Rounds
Unlike regular crochet rows, amigurumi is worked in spirals.
After completing your first round:
- Do not join with a slip stitch.
- Continue crocheting into the first stitch.
- Use a stitch marker to mark the beginning of each round.
This prevents visible seams.
Step 3: Increase Stitches
Increasing helps shape your amigurumi piece.
To increase:
- Make 2 single crochet stitches in the same stitch.
Example beginner increase pattern:
- Round 1: 6 stitches
- Round 2: Increase in each stitch (12 stitches)
- Round 3: (1 SC, 1 increase) repeat around
This creates a growing circle.
Step 4: Crochet the Body Shape
Continue following increase rounds until your piece reaches the desired width.
Then:
- Crochet even rounds (1 SC in each stitch)
- This builds height and forms the body
For a simple ball shape:
- Increase
- Crochet even rounds
- Then begin decreasing
Step 5: Decrease Stitches
Decreasing shapes the top and closes the piece.
To decrease:
- Insert hook into next stitch
- Pull up a loop
- Insert into next stitch
- Pull up another loop
- Yarn over and pull through all loops
Invisible decreases create smoother results.
Step 6: Add Safety Eyes and Stuffing
Before closing completely:
- Insert safety eyes between specific rows.
- Add fiberfill stuffing gradually.
- Shape evenly — don’t overstuff.
Proper stuffing gives your amigurumi a soft and balanced look.
Step 7: Close and Finish
Continue decreasing until the opening closes.
Cut yarn, pull through the final loop, and weave in the end securely.
Your first amigurumi piece is complete.
Easy Beginner Amigurumi Projects
Start with:
- Small ball
- Mini whale
- Simple octopus
- Tiny teddy bear
Avoid complex dolls or detailed animals at first.
Common Amigurumi Mistakes
- Loose stitches
- Skipping stitch marker
- Overstuffing
- Using thick yarn with small hook
Patience and practice are key.
Final Thoughts
Amigurumi is a fun and creative way to bring yarn to life. With just basic crochet knowledge and a little patience, you can create adorable handmade toys and gifts.
Start small, practice regularly, and don’t worry about perfection — every project helps you improve.