Kirby Amigurumi is more than just a cute crochet project — it is a delightful blend of creativity, nostalgia, and handmade charm that brings one of the most beloved video game characters into the world of yarn art. Whether you are a beginner learning the basics of crochet or an experienced crafter searching for your next project, creating a Kirby Amigurumi piece offers both fun and satisfaction. The combination of simple shapes and expressive details makes this character ideal for anyone who loves crafting.
The art of amigurumi has grown significantly in popularity over the past decade. Handmade plush toys are now widely appreciated not only as decorative items but also as thoughtful gifts and collectibles. When you combine this Japanese crochet technique with a character as iconic as Kirby, the result is a project that resonates with fans of gaming, handmade art, and creative hobbies alike.
In this comprehensive guide, you will learn everything you need to know about Kirby Amigurumi, including what amigurumi is, the materials required, step-by-step construction principles, customization ideas, and frequently asked questions. This article is designed to be SEO-friendly, informative, and aligned with quality content guidelines, ensuring you get reliable and valuable insights into the craft.
What Is Kirby Amigurumi?
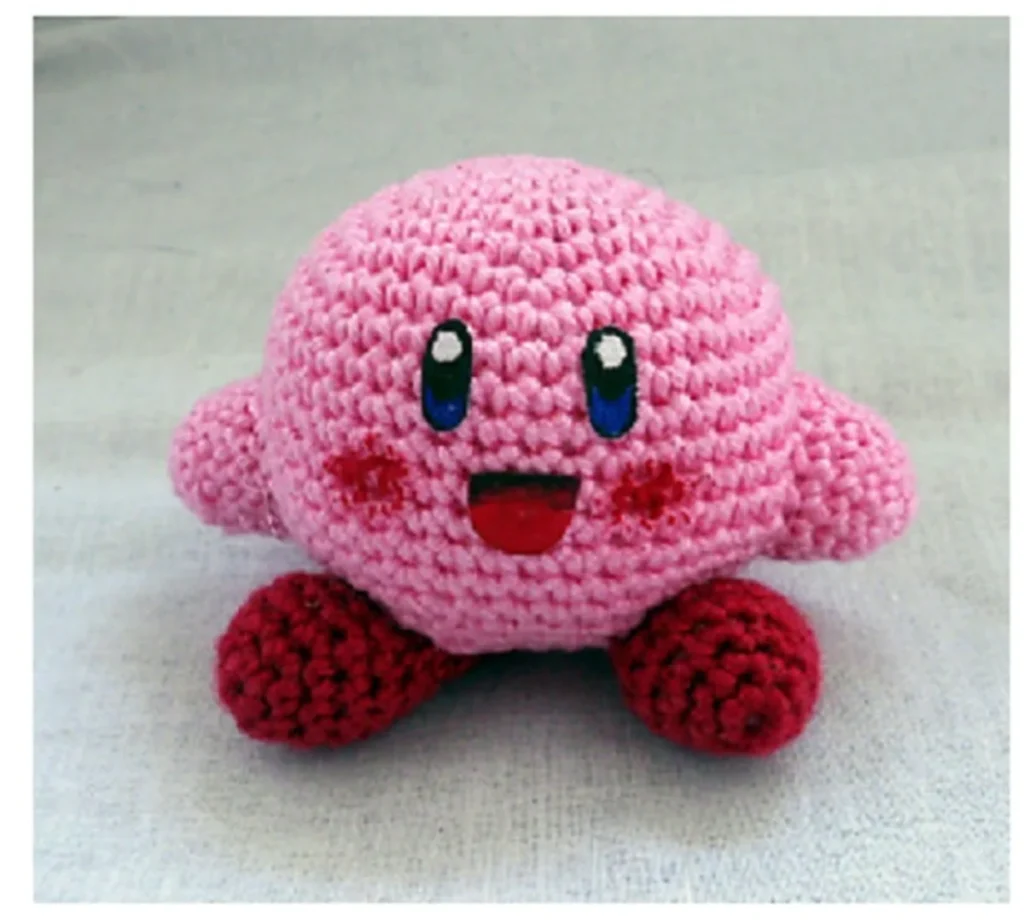
Kirby Amigurumi refers to a handmade crochet or knitted plush version of the famous pink character Kirby, created using the Japanese technique known as amigurumi. The word “amigurumi” combines two Japanese terms: “ami” (crocheted or knitted) and “nuigurumi” (stuffed doll). Together, they describe the art of crafting small stuffed figures using yarn.
Kirby, originally introduced in Nintendo video games, is known for his round body, small arms, large eyes, and cheerful expression. These simple design features make him an ideal subject for amigurumi projects. Because his body is essentially spherical, crocheters can focus on mastering basic stitches while still achieving a recognizable result.
Creating a Kirby Amigurumi usually involves working in continuous rounds, often starting with a magic ring. The body is shaped using increases and decreases to form a smooth, round structure. This technique helps achieve a seamless appearance, which is especially important for plush characters.
The face details — such as the oval eyes and rosy cheeks — are typically added using felt, embroidery, or safety eyes. These small elements bring personality to the final piece and transform simple yarn into an expressive character.
One of the appealing aspects of this project is accessibility. Even beginners can attempt a basic version of Kirby, as the stitches required are usually limited to single crochet, increase, decrease, and slip stitch. More advanced crafters can experiment with shaping and detailing.
In summary, Kirby Amigurumi is a creative craft project that merges pop culture with traditional handmade techniques. It allows fans to celebrate their favorite character while practicing valuable crochet skills.
Essential Materials for Kirby Amigurumi
Before starting your Kirby Amigurumi, it is important to gather the right materials. Choosing quality supplies will ensure your final piece looks polished and durable. Fortunately, this project does not require expensive tools.
The most important material is yarn. For an authentic look, soft pink yarn is typically used for the body, while red yarn is used for the feet. Black and white yarn or felt pieces are commonly used for the eyes. Acrylic yarn is popular because it is affordable and easy to maintain.
You will also need an appropriate crochet hook. The size depends on your yarn choice, but many crafters prefer a slightly smaller hook than recommended to create tight stitches. Tight stitching prevents stuffing from showing through the fabric.
Polyester fiberfill is commonly used as stuffing. It helps give the Kirby Amigurumi its signature round shape. Make sure to fill evenly and firmly, but not so tightly that the stitches stretch excessively.
Safety eyes are an optional addition that can enhance realism. However, if the plush is intended for young children, embroidered eyes may be safer. Always prioritize safety when making toys.
Other helpful tools include a yarn needle for sewing pieces together, stitch markers to track rounds, and small scissors for trimming yarn ends. Having these tools organized before you begin will make the crafting process smoother.
By selecting the proper materials, you lay the foundation for a successful and visually appealing Kirby Amigurumi project.
Step-by-Step Creation Process
The process of making Kirby Amigurumi usually begins with the body, as it forms the core of the design. Start by creating a magic ring and crocheting several single crochet stitches into the ring. Gradually increase stitches in each round to form a flat circle.
As you continue crocheting, the circle will expand and begin curving upward naturally. This technique creates the spherical shape that defines Kirby’s body. Maintain consistent tension to keep the stitches uniform.
Once the body reaches its widest point, you will stop increasing and crochet evenly for several rounds. This forms the midsection. Afterward, begin decreasing stitches gradually to close the shape.
Before fully closing the body, insert the fiberfill stuffing. Add small amounts at a time and shape the plush with your hands to maintain a smooth, round appearance. Continue decreasing until the opening is small enough to sew shut.
The arms and feet are typically crocheted separately. Kirby’s arms are small oval shapes, while his feet are slightly larger and flatter. These pieces are sewn onto the body carefully to maintain symmetry.
Finally, add facial features. Whether using embroidery or felt cutouts, position the eyes evenly and ensure the cheeks are placed symmetrically. These final touches give your Kirby Amigurumi its recognizable and charming personality.
Customization and Creative Variations
One of the most exciting aspects of making Kirby Amigurumi is the opportunity for customization. While the classic pink Kirby is timeless, many crafters enjoy experimenting with colors and expressions.
You can create different versions inspired by various Kirby transformations. For example, adding a small hat or accessory can represent specific abilities from the games. These details make your plush unique and personal.
Changing yarn textures is another creative option. Velvet yarn gives a soft, luxurious finish, while cotton yarn provides a smoother, more structured look. Each texture creates a different aesthetic effect.
You may also adjust the size of your Kirby Amigurumi by using thicker yarn and a larger hook or thinner yarn for a miniature version. Scaling projects allows for diverse display possibilities.
Personalizing facial expressions is another way to add character. A winking eye or open smile can make your plush stand out. Small embroidered details can dramatically change the overall mood.
Some crafters incorporate keychain attachments or hanging loops, transforming the plush into a portable accessory. This practical addition expands how the finished piece can be used.
Customization ensures that every Kirby Amigurumi project feels special, even when following the same base pattern.
FAQ About Kirby Amigurumi
What skill level is required to make Kirby Amigurumi?
Most basic patterns are beginner-friendly. If you understand single crochet, increasing, and decreasing, you can complete a simple design successfully.
How long does it take to finish Kirby Amigurumi?
Depending on experience and size, it can take anywhere from a few hours to a couple of days. Smaller versions are generally quicker to complete.
What type of yarn is best for Kirby Amigurumi?
Acrylic yarn is commonly recommended for beginners due to affordability and ease of use. Cotton and velvet yarns are also popular for different textures.
Can I sell my handmade Kirby Amigurumi?
If you create the item yourself and comply with applicable intellectual property guidelines, many crafters sell handmade plush toys. Always ensure you follow relevant legal considerations in your region.
How do I clean Kirby Amigurumi?
Most acrylic yarn plushies can be gently hand washed with mild soap and air dried. Always check the yarn label for specific care instructions.
Why is my Kirby not perfectly round?
Inconsistent tension, uneven stuffing, or incorrect stitch counts can affect shape. Using stitch markers and evenly distributing fiberfill can improve results.
Is Kirby Amigurumi safe for children?
If you use embroidered eyes instead of safety eyes and securely attach all pieces, it can be suitable. Always ensure parts are tightly sewn to prevent detachment.
Can I make a larger Kirby Amigurumi?
Yes, simply use thicker yarn and a larger crochet hook. You may also follow patterns specifically designed for larger plush toys.
Conclusion
Creating Kirby Amigurumi is a rewarding experience that blends creativity, skill development, and nostalgic joy. Throughout this guide, we explored what amigurumi is, the essential materials needed, the step-by-step construction process, and exciting customization options. Each stage of the project allows crafters to build confidence while enjoying a relaxing and productive hobby.
By understanding proper techniques, selecting quality materials, and practicing patience, you can craft a charming and durable plush character. Whether you are making it for yourself, as a gift, or as part of a creative collection, Kirby Amigurumi remains a timeless and enjoyable crochet project that celebrates both handmade artistry and imaginative design.